Being that I am a diehard plant parent, propagating plants truly is one of my favorite hobbies!
My addiction to all green leafy things with roots, started when I was a young boy. I was inspired by my mom showing me how to propagate outdoor plants like “ice plants” and succulents. I found this to be a fun and rewarding hobby then and even more so now!
Through the years I have tried and tested the most common techniques associated with propagating most of my leafy friends. Some of my propagation experiments, among many, have included: air layering, rooting plants directly in the soil, dividing plants, rooting plants in water, and rooting plants with rooting hormone, including gel rooting hormone and rooting powder. As you can imagine, I have just about used and tried it all when it comes to propagation.
At this point, I find this to be a cathartic pastime that has become second nature to me. Often while propagating I dream of turning my hobby into a full-time career by starting a très-chic boutique plant shop on a stunning Parisian avenue, befriending the local patrons, and meeting all the plant parents in the neighborhood. Ahhh, one day!
What if I don’t have room for all these plants?
Until I fulfill my Parisian dream, I love to share the indoor plants that I have rooted with my friends and family. I find they make great gifts for birthdays and special occasions!
Make some $$$
In the past, I have also found new homes for some of my abundant plant children, by bartering or selling them to other loving plant parents. This has helped me to replenish my plant fund, always with the intention of growing diversity in my leafy family.
This blog post will be focused on the basics of air layering plants
We will discuss the general techniques used and basic ways of air layering plants. We will also be featuring added specific tips for our featured plant the philodendron.
In this blog, we will go over the following topics:
What is air layering and why would you want to do it
How to air layer a house plant like a philodendron
The benefits of air layering
How to care for your newly air-layered plant
What is air layering and why would you want to do it?
Air what? Air slayer? No, Air Layer!
If are you looking for an easy and fun way to propagate your plants, you should consider the technique called air layering.
Air layering is essentially a form of plant propagation.
This process involves forming a new root system on the stem of an ideally healthy plant. This process is completed while the stem is still attached to the parent plant (I know, right!).
At a later date, this is followed by separating the newly established plant with its newly developed root system from the parent plant.
Afterward, this newly established plant can then be grown completely on its own.
Air layering is also a great way to build up the number of leafy friends in your collection, without thinning down the vibe you currently love.
It also gives you the ability to acquire more plants without having to go through the trouble and lengthy time it takes to grow new houseplants from seeds or even other propagation methods like rooting cuttings.
It will also save you some bucks since you are not paying the premium prices most desirable plants are fetching now.
Air layering is natural
Air layering propagation is a process that often occurs naturally in nature. In the wild, this process occurs when a low branch or stem comes in contact with the ground. Usually, this involves some minor damage to the area in contact with the ground, most likely caused by bugs or animals.
This doesn’t happen overnight, the branch or stem must be in contact with the soil for a long enough period of time that it can develop its own root system.
Plant Nerd Alert!
Because air layering is an asexual process, the genetic material is directly transferred to the newly rooted stem. Thus creating an identical copy of its parent even after the air-layered plant is separated from the mother plant.
Is air layering the correct method for me?
There are several reasons why you might want to give air layering plants a go.
One reason is that air layering can be a quick and easy way to create more plants. Air layering is also a good way to propagate plants that are difficult to propagate through other methods, such as rooting cuttings in water or soil. Lastly, air layering can be used to rescue an injured or unhealthy plant.
Another reason to air layer a plant is to create a lush jungle vibe or a full or compact-looking plant.
Do you have a treasured plant like an established philodendron in your home or space that is getting too leggy or spindly? We all have had them in the past or possibly still do, consider air layering your leggy plants! In doing so you will create a new, smaller version. This new “plant baby” can then be planted at the base of the “mother plant” to help fill in the gaps and make the “mother plant” look full and lush.
This propagation method works really well on many tropical plants that are often grown indoors. These include:
Monstera
Croton
Dieffenbachia
Dracaena
Hibiscus
Ficus elastica or rubber plant
Fiddle leaf fig
Weeping fig
Philodendron
Ivy
Schefflera
Why air layer a plant
Air layering propagation is a great way to reproduce rare plants.
Air layering is also a good way to propagate rare specimens or variegated plants. It’s always a gamble when you take a cutting of one of your treasured plants. You risk the possibility the cutting will not root successfully. There is always a chance that the cutting could dry or rot out. Or maybe it’s just finicky and can take too long to root with these other methods.
Depending on the plant, air layering can take a long time for the new plant to root as well. The big difference is that the new plant is still being fed water and nutrients from the mother plant. This gives stubborn plants the time and energy to be duplicated.
Plant Nerd Alert!
Variegated plants have acquired a genetic defect that causes the leaves and stems to have two or more colors. Some variegated plants are extremely difficult to propagate by other methods, but air layering often works well.
Last ditch efforts
Lastly, air layering can be used to rescue injured, sick or unhealthy plants. If you have a plant like a philodendron that has been damaged by root rot, pests, or diseases and you can’t figure out why that has happened, then air layering may be one of the remaining options to save the plant. This is especially true if the plant is showing signs of decline starting from the ground and moving upwards.
The new root system formed by the air layering process will provide water and nutrients to the plant and keep the newest growth alive and healthy.
Pro tip:
Keep an eye on your plants!
I admit that I am a helicopter plant parent, always doting around my loft garden, washing leaves, and paying attention to every new leaf and the progress of its growth! From my experience, I find it’s usually easier to save a distressed plant if you catch it sooner rather than later. Paying attention to your green leafy family will help you catch problems before the plant becomes terminal.
A note on air layering a philodendron
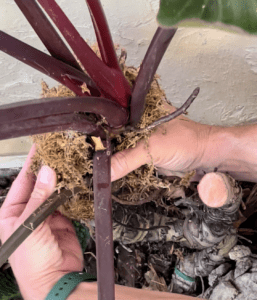
Often tropical plants like Philodendrons, Monsteras, and Pothos will produce aerial roots naturally on their own. Indoor plants like these are semi-epiphytic and will produce new roots on any suitable damp surface, like moist sphagnum moss or even damp softwood.
If you plan to air-layer a plant like these, there is no need to cut into the stem or apply rooting hormones. Just follow the step-by-step guide below and omit the cutting and hormones part.
Air layering technique: Step-by-step instructions
Step 1
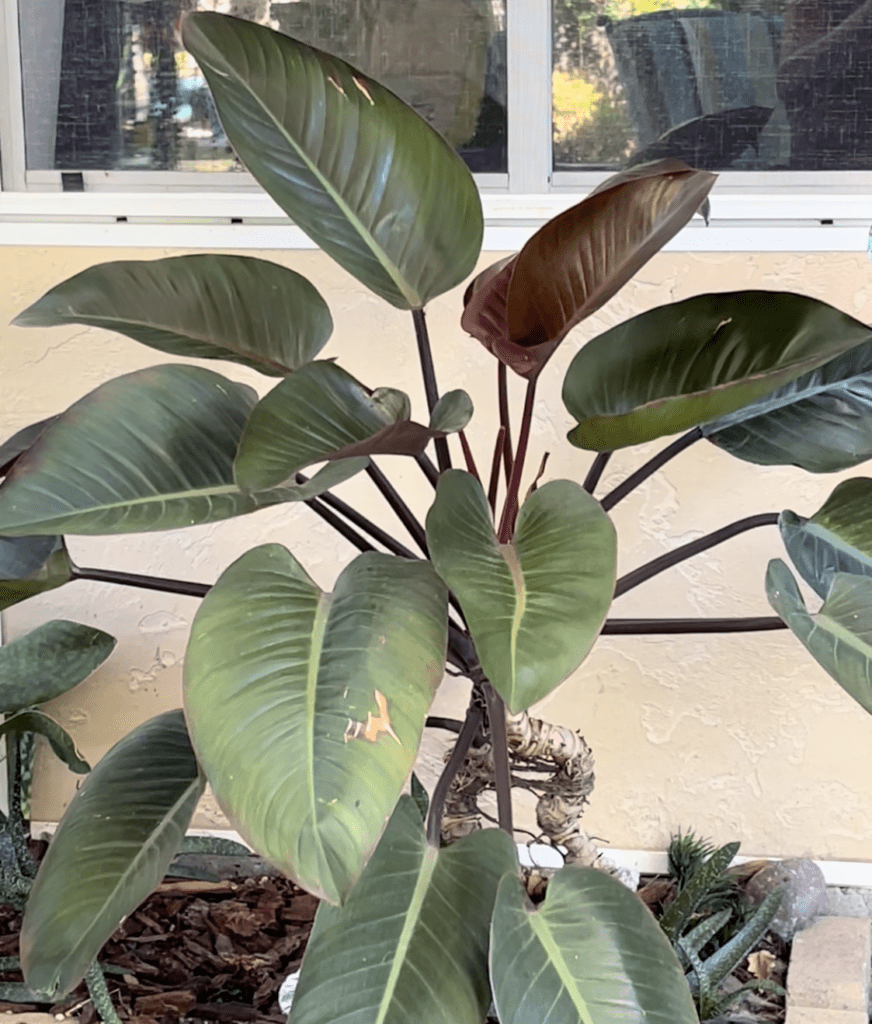
Choose a healthy plant that you want to propagate. Like the large stem or top portion of the pictured philodendron.
It’s best to leave at least two-thirds of the original stem while insuring you have at least a six to eight-inch stem that you intend to propagate.
Be sure to remove any leaves that are near the area where you would like roots to develop.
Use a sterilized sharp knife or set of pruning shears to make a clean cut halfway through the stem. Alternatively, you can make several shallow cuts with a sharp knife around the same area of the stem.
To insure roots form properly, apply rooting hormone gel or powder to the cut area of the plant stem. You can find rooting hormones at your local garden center or online.
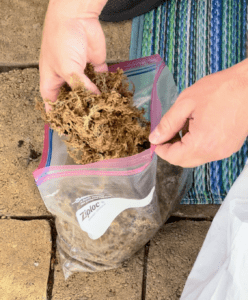
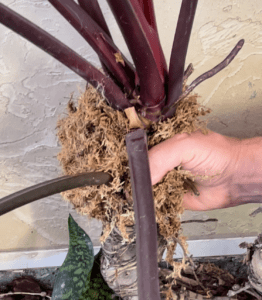
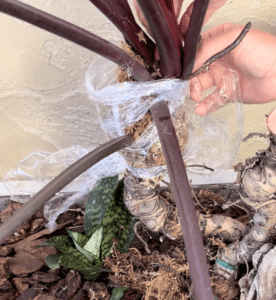
Then with your hands create a moss ball, by placing moistened sphagnum moss on the stem to cover the rooting hormone (or aerial roots). It is important to make sure that the entire root or cut area is covered with moistened sphagnum moss.
Next cover or wrap the Sphagnum Moss in a polyethylene film or plastic wrap, a plastic bag, or try your hand at recycling a hard plastic bottle.
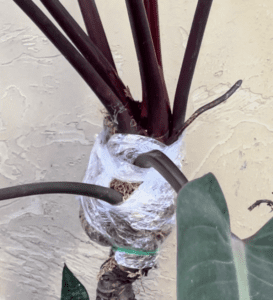
Be sure to secure the top and bottom of the bag, plastic wrap, or Polyethylene film with garden twine, floral ties, or twist ties to insure the plastic wrap stays in place. The same goes for the plastic bottle up-cyclers!
Be sure to place the mother plant in a shady spot out of direct sunlight. Check on your plant every few days to make sure that the moistened sphagnum moss is still moist. After a few weeks, you should see new roots growing out of the cut area of the stem.
In the next few weeks or possibly months, you will notice roots developing under the plastic. When the new roots are a few inches long, carefully remove the rooted branch from the original plant, by cutting the stem just below the rooted section.
Step 2
Next plant it in a pot filled with a well-draining, moistened growing medium.
Water the growing medium well, and insure that you have removed any air gaps in the growing medium. In doing so you will provide adequate moisture for the plant to produce roots and regain its strength.
Remember to keep your new plant child in a protected, shady spot until it has fully rooted into its new pot.
Supply list
For step one:
A plant you want to propagate
Plastic wrap
Sphagnum moss
Twist ties
Rooting hormone – preferably gel
For step two:
A pot or planter
Growing medium
Water
The growing benefits of air layering
The air layering method provides many benefits, including:
Air layering eliminates unnecessary stress on your leafy friends that could be caused by other methods of propagation.
Easy way to propagate most ornamental plants and fruit trees without having to plant seeds or root cuttings
Easy way to propagate variegated plants
It’s a great way to rescue injured or unhealthy plants
Ensures an identical copy of the parent plant
Ensures success in reproducing rare or hard-to-propagate plants
How to care for your newly air-layered philodendron
Now that you have successfully air-layered your first plant, you need to know how to care for it.
Steps to Success
To insure your new roots are happy and healthy be sure to give your plant plenty of water.
Place your plant baby in a shady spot and avoid excessive heat or direct sunlight.
Fertilize your plant child every two weeks with a mild or diluted water-soluble fertilizer.
Re-pot your plant in a pot one size larger when the new roots start to fill up the current pot.
Keep a close eye on your leafy friend to insure it is clean and free of pests.
Thank you for reading my Blog on Air layering.
I hope you have enjoyed learning about an exciting, surefire way of reproducing your special plants. Check back in the future to see the progress of our air-layered philodendron.